Cursor + Cline: ClaudeAPI setup with Opus 4.7 and Roo Code notes
You can run Claude-powered coding workflows in Cursor by installing Cline and pointing it at ClaudeAPI through an Anthropic-compatible base URL. This gives you token-based API billing instead of relying only on a fixed editor subscription such as Cursor Pro’s $20/month plan. The key detail in this setup is that claude-opus-4-7 may need to be entered manually because it may not appear in the model dropdown.
Prerequisites
Before you start, prepare a Cursor or VS Code workspace, the Cline extension, and a ClaudeAPI key. ClaudeAPI is an API gateway, not an Anthropic product, and this tutorial uses its Anthropic-compatible endpoint for Cline.
Create an account at ClaudeAPI, then open the ClaudeAPI console. Top up your account balance, create an API key, select the required key group if the console asks for one, and copy the sk- key when it is shown.
Payments are processed via Stripe with support for major credit cards. Enterprise invoicing or wire transfer may be available for team accounts.
ClaudeAPI base URL options
Use one of the following base URLs. Both routes use the same API key, so you can switch between them if your workload is sensitive to latency or streaming reliability.
| Endpoint | Best fit | Difference |
|---|---|---|
https://gw.claudeapi.com |
Default global gateway | Global routing for most workloads |
https://hk.claudeapi.com |
Regional route | Useful for latency-sensitive coding-agent sessions |
Do not add /v1 at the end. Cline builds the Anthropic path itself, so manually entering /v1 can produce a broken request path such as /v1/v1/messages.
Why Cline is the default choice
Roo Code is a fork of Cline, and it adds more aggressive agent behavior. For a straightforward “use Claude inside Cursor” workflow, Cline is the safer default because it is conservative, easy to configure, and follows upstream Anthropic SDK changes closely.
| Dimension | Cline | Roo Code |
|---|---|---|
| Upstream Anthropic SDK updates | Fast; new models are usually supported quickly | Follows Cline and can lag |
| Default behavior | Conservative; asks before each major step | More aggressive automation by default |
| ClaudeAPI compatibility | Works with base URL plus custom model ID | Similar, but some versions validate custom model IDs more strictly |
| Learning curve | Low | Medium, with Code, Architect, and Ask modes |
If you only want Claude coding help inside Cursor, start with Cline. Roo Code is best treated as an option for users who already know Cline and want more autonomous behavior.
Configuration steps
Install Cursor first if you do not already have it. Cursor is available for Windows, macOS, and Linux from cursor.com.
# macOS
brew install --cask cursor

# Windows
winget install Anysphere.Cursor
# macOS
brew install --cask cursor

# Windows
winget install Anysphere.Cursor
Cursor is built on the VS Code ecosystem, so the extension marketplace and keyboard shortcuts will feel familiar if you have used VS Code before. The same Cline setup also works in standard VS Code.
Install Cline
Open Cursor, choose “Open Project” or “Open Folder”, and open any workspace. Cline works best when it has a real project directory to inspect and edit.
Install Cline from the Extensions view:
- Click the Extensions icon in the left activity bar.
- Search for
Cline. - Choose the extension by
saoudrizwan. - Click Install.
- After installation, open Cline from the robot icon in the activity bar.
At the time of the source walkthrough, the Marketplace listing showed roughly 4 million installs. The source walkthrough assumes Cline 3.84.0; update first if your installed version is much older, because earlier builds had issues around custom model IDs.
Useful source links:
Configure the Anthropic provider
Open the Cline panel, click the Settings gear, then choose API Configuration.
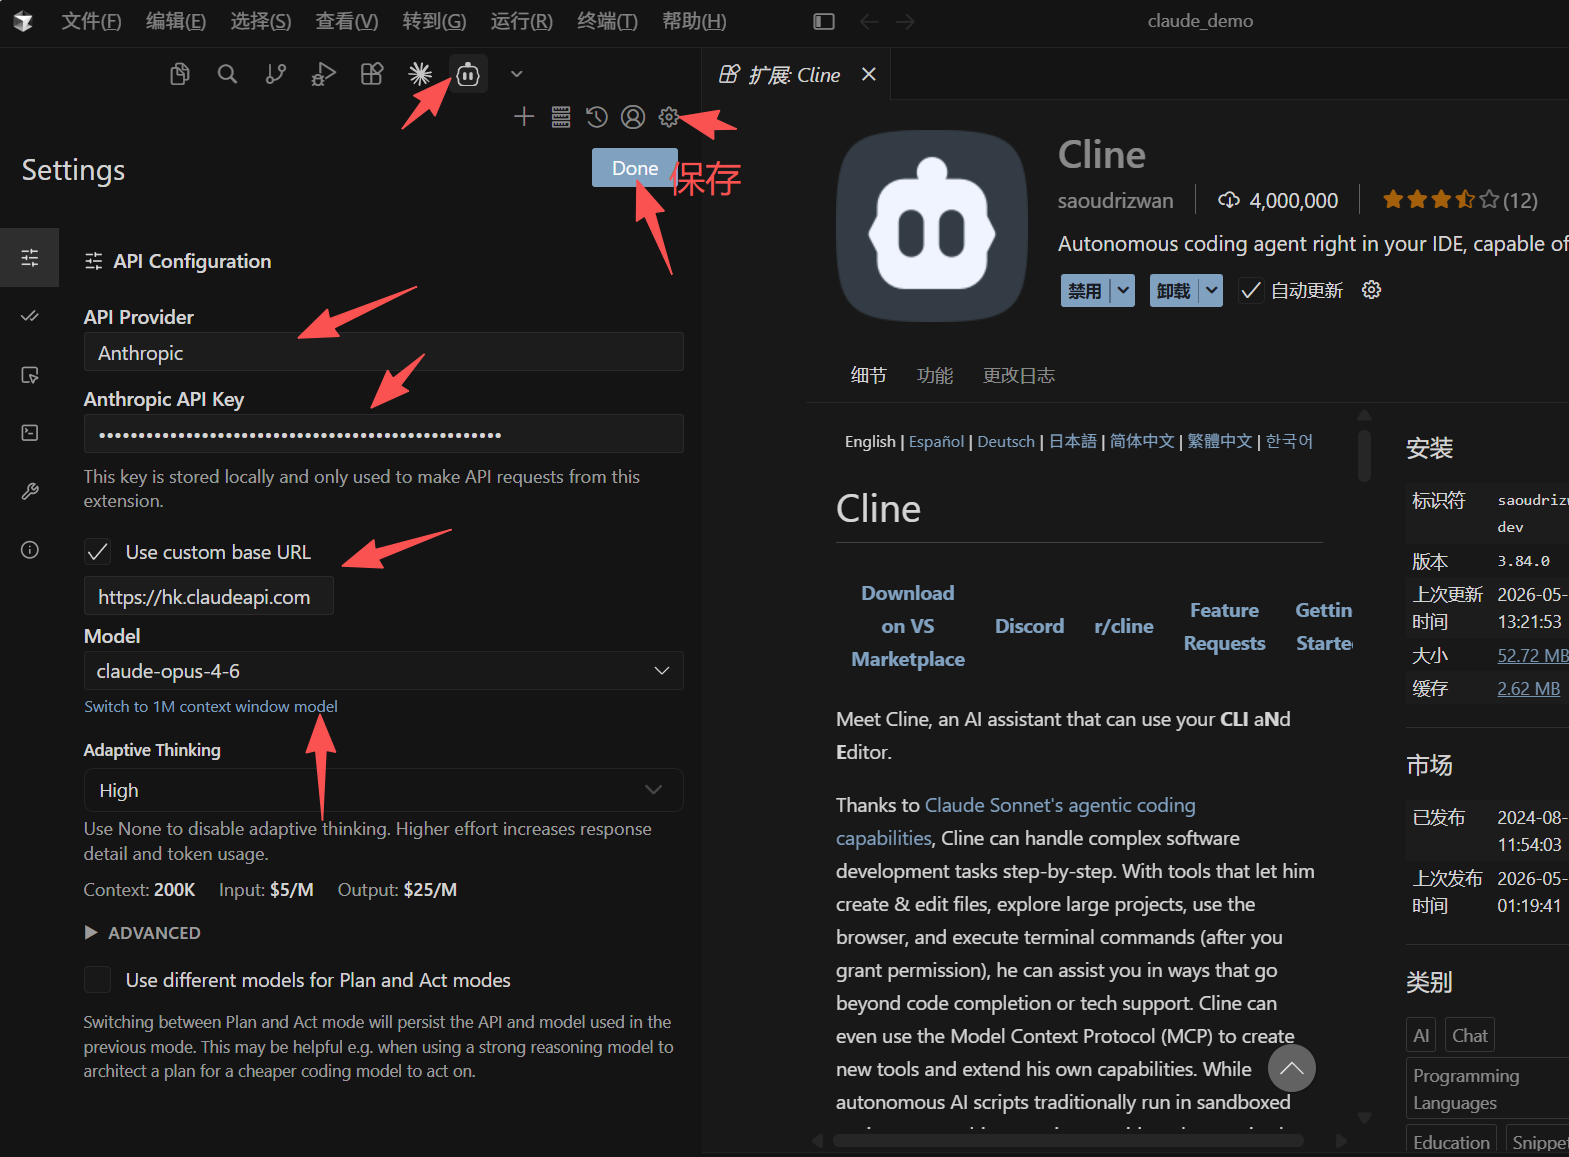
Fill the fields as follows:
| Field | Value | Notes |
|---|---|---|
| API Provider | Anthropic |
Use Anthropic, not OpenAI Compatible |
| Anthropic API Key | Your ClaudeAPI key beginning with sk- |
Copy it from the ClaudeAPI console |
| Use custom base URL | Enabled | Required for the gateway endpoint |
| Base URL | https://gw.claudeapi.com or https://hk.claudeapi.com |
Do not append /v1 |
| Model | See the model list below | claude-opus-4-7 may need manual entry |
| Adaptive Thinking | High for coding tasks |
Use lower settings for simpler chats |
Choosing the provider matters. This setup uses the Anthropic request format, so selecting OpenAI Compatible will send the wrong request shape and usually leads to 400 or 401 errors.
Enter claude-opus-4-7 manually
In the tested Cline 3.84.0 flow, the built-in Anthropic model dropdown went up to claude-opus-4-6 and did not list claude-opus-4-7. If your dropdown does not show Opus 4.7, type the model ID manually.
Use these model IDs:
claude-opus-4-7              # Complex coding, architecture, long context
claude-opus-4-6              # Same price tier, often present in dropdowns
claude-sonnet-4-6            # Recommended daily development model
claude-haiku-4-5-20251001    # Fast lightweight model for simple tasks
claude-opus-4-7              # Complex coding, architecture, long context
claude-opus-4-6              # Same price tier, often present in dropdowns
claude-sonnet-4-6            # Recommended daily development model
claude-haiku-4-5-20251001    # Fast lightweight model for simple tasks
After entering claude-opus-4-7, Cline should show a 200K context window. If your provider and account support the larger Opus context option, use the “Switch to 1M context window model” link.
Pricing comparison
The source pricing table is converted to USD at a fixed 1 USD = 7 CNY rate for the English site.
| Model ID | Input | Output |
|---|---|---|
claude-opus-4-7 / claude-opus-4-6 |
$2.9 / M tokens | $14 / M tokens |
claude-sonnet-4-6 |
$0.57 / M tokens | $2.9 / M tokens |
claude-haiku-4-5-20251001 |
$0.14 / M tokens | $0.71 / M tokens |
For coding with Opus 4.7, start with Adaptive Thinking set to High. The additional reasoning tokens can be cheaper than repeated failed low-reasoning attempts on complex debugging or refactoring tasks.
Use these Adaptive Thinking levels as a starting point:
| Setting | Use case |
|---|---|
None |
Basic chat and lowest-cost simple tasks |
Low |
Short reasoning for simple coding help |
Medium |
Balanced everyday development work |
High |
Complex bugs, architecture, long context, and agentic coding |
Optional Roo Code configuration
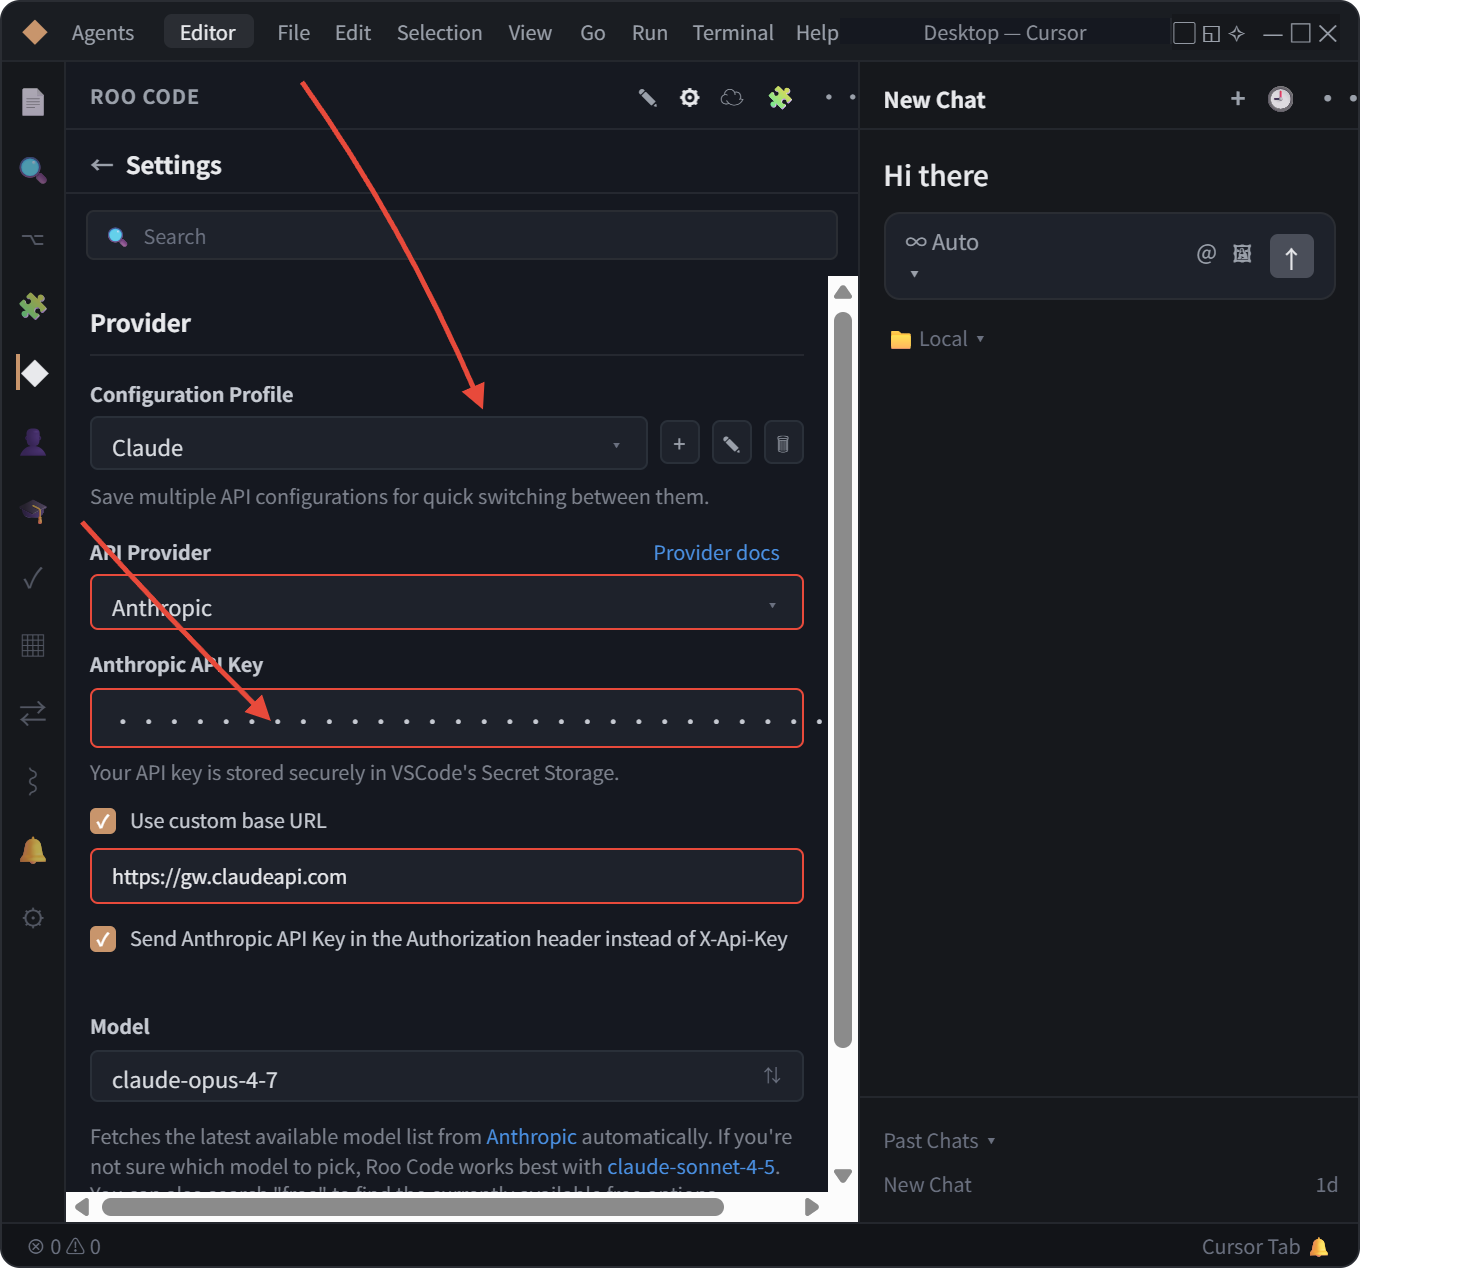
If you already use Roo Code or a maintained fork, the provider configuration is similar. Select Anthropic, enable the custom base URL field, enter your ClaudeAPI key, and type the model ID manually if the dropdown does not include it.
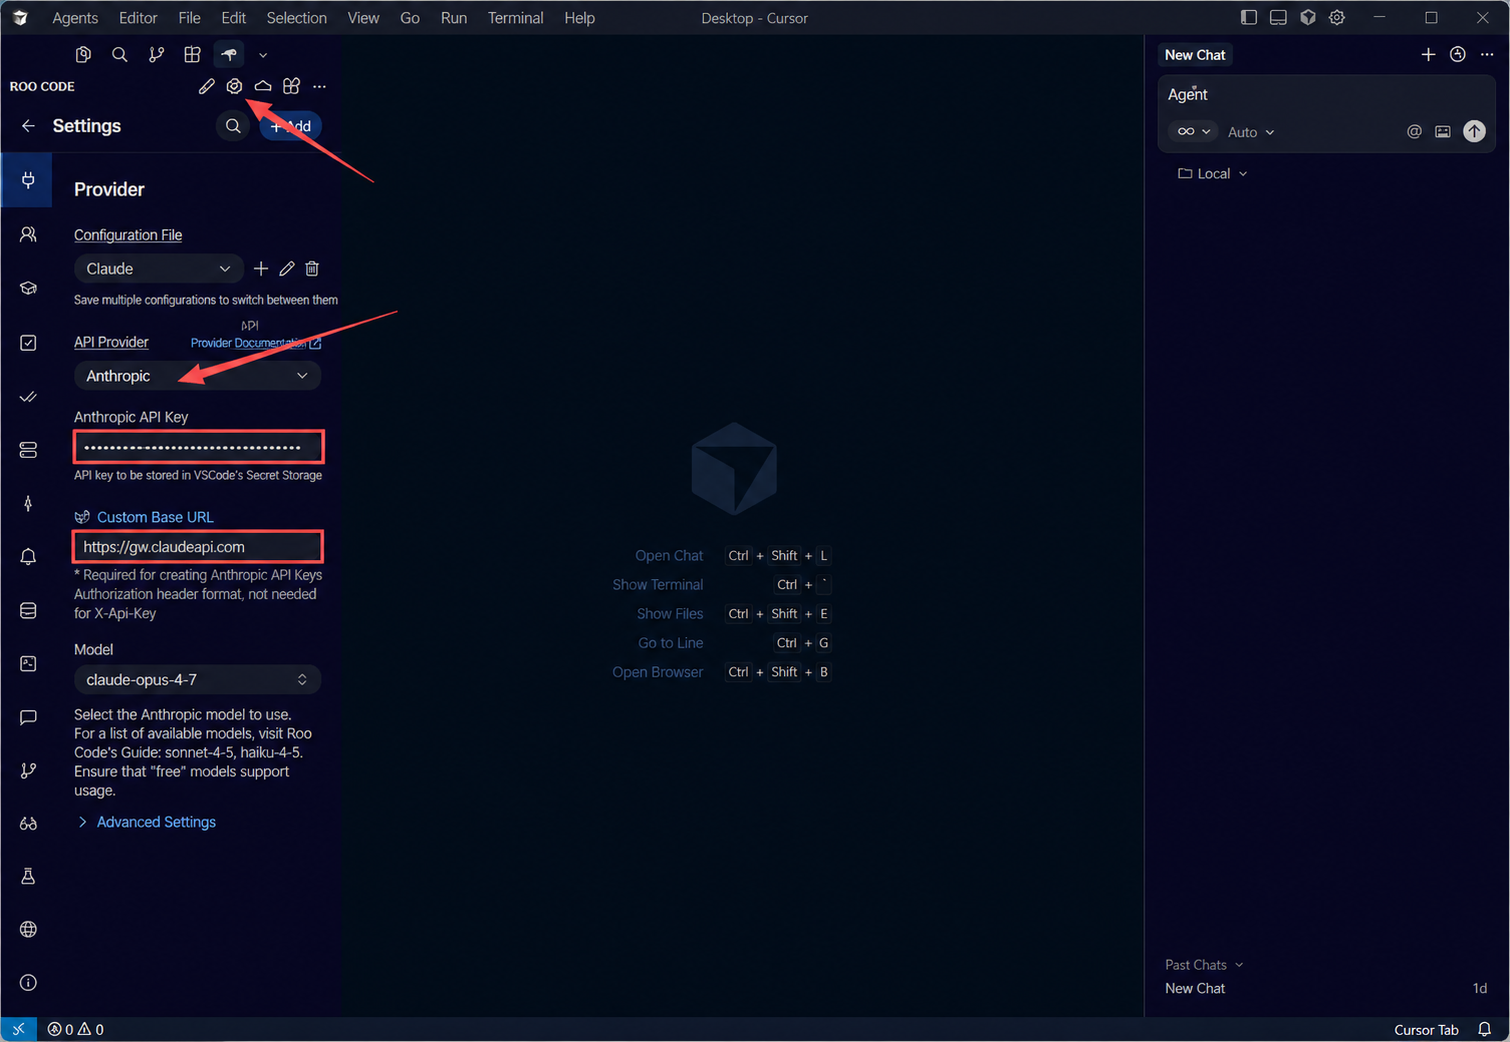
| Field | Value |
|---|---|
| API Provider | Anthropic |
| Use custom base URL | Enabled |
| Custom base URL | https://gw.claudeapi.com or https://hk.claudeapi.com |
| API Key | Your sk- ClaudeAPI key |
| Model | Type claude-opus-4-7 manually if needed |
 |
|
If Roo Code rejects claude-opus-4-7 with a model not found message, upgrade the extension if possible, use claude-opus-4-6, or switch back to Cline. |
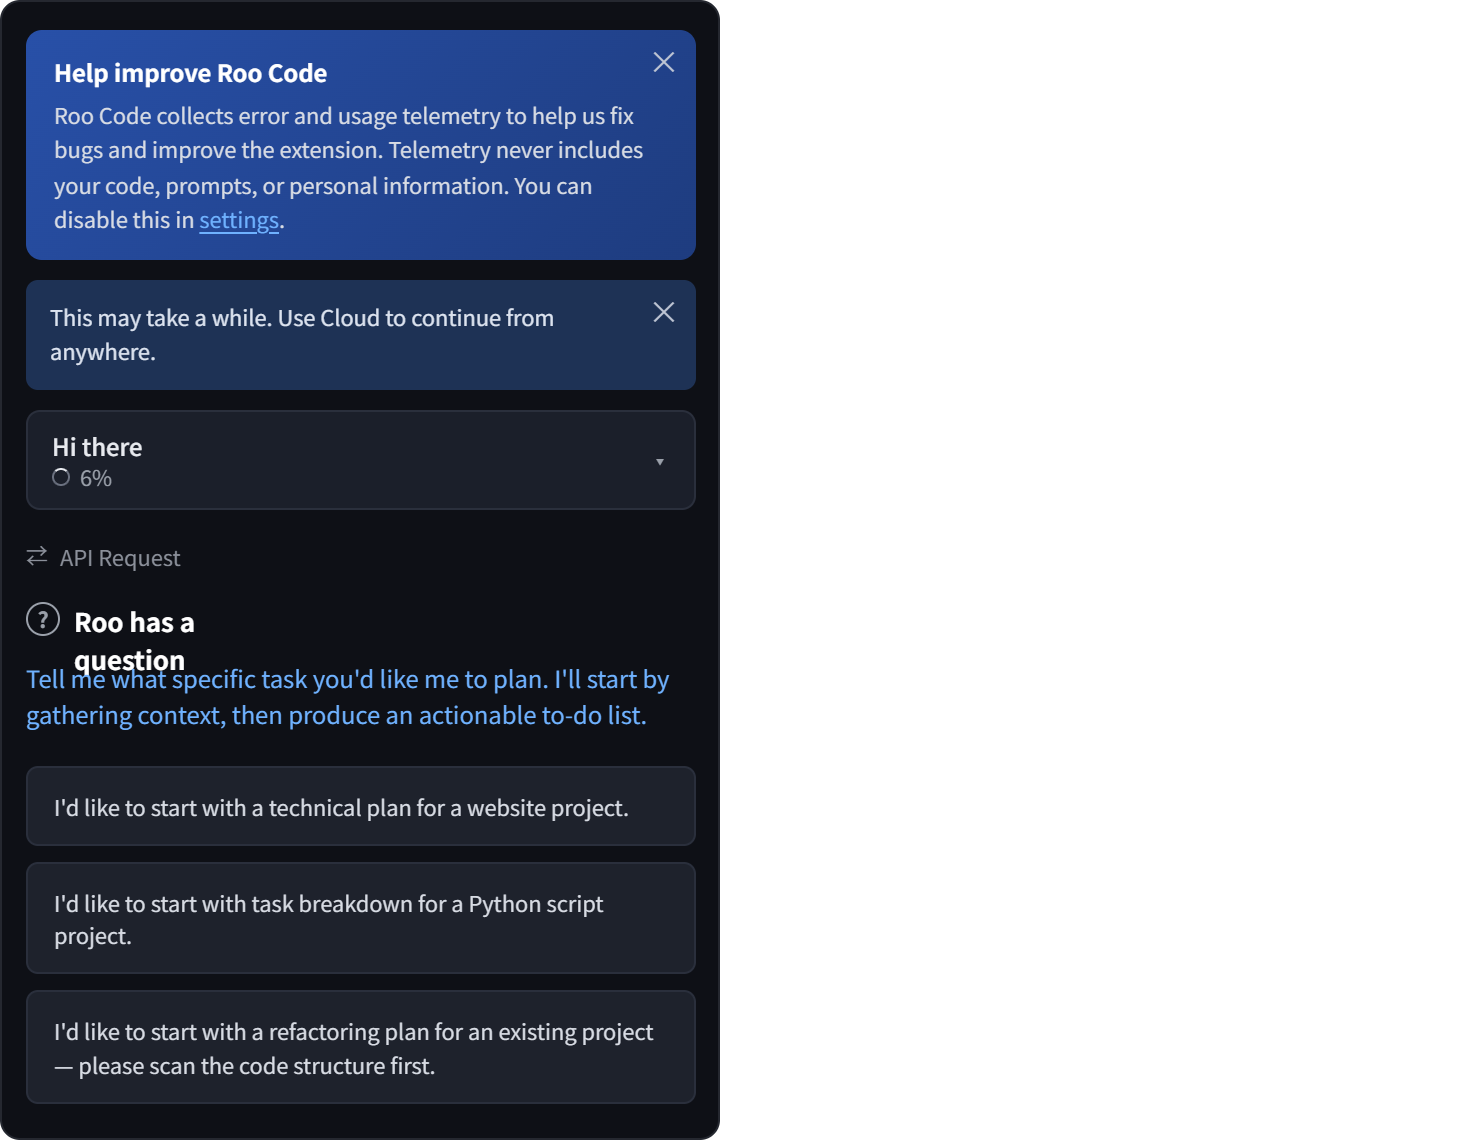
After configuring Roo Code, set Mode to Code for daily development or Architect for design work. Avoid running development tasks in Ask mode, because Ask mode has no tool permissions.
Optional Cursor display language
If you prefer the Cursor UI in another language, install the matching VS Code language pack from the Extensions view. For Simplified Chinese UI, search for chinese, install “Chinese (Simplified) Language Pack”, open the command palette, choose “Configure Display Language”, select zh-cn, and restart Cursor.
Cline has its own interface language setting, and newer versions may follow the system language automatically.
Verify the connection
Save the Cline configuration, return to the main Cline panel, and send a small test prompt.
Hello. Please tell me which model you are and what context window size is active.
Hello. Please tell me which model you are and what context window size is active.
If Cline streams a normal response, the configuration is working. If the response fails immediately, check the provider, key, base URL, and model ID first.
Parameter reference
Use this table as the short setup checklist for both Cline and Roo Code.
| Parameter | Cline value | Roo Code value | Notes |
|---|---|---|---|
| API provider | Anthropic |
Anthropic |
Do not use OpenAI Compatible for this Anthropic-format setup |
| Base URL | https://gw.claudeapi.com or https://hk.claudeapi.com |
Same | Do not add /v1 |
| API key | sk-your-claudeapi-key |
sk-your-claudeapi-key |
Copy from the ClaudeAPI console |
| Model | claude-opus-4-7 |
claude-opus-4-7 |
Type manually if not listed |
| Fallback model | claude-opus-4-6 |
claude-opus-4-6 |
Use if custom model validation fails |
| Coding default | Adaptive Thinking High |
Mode Code or Architect |
Lower reasoning for simple chat tasks |
Quick reference:
Cline / Roo Code
├── API Provider: Anthropic
├── Base URL: https://gw.claudeapi.com or https://hk.claudeapi.com
├── API Key: sk-your-claudeapi-key
├── Model: claude-opus-4-7
│          claude-opus-4-6
│          claude-sonnet-4-6
│          claude-haiku-4-5-20251001
└── Adaptive Thinking: High for coding, None for low-cost chat
Cline / Roo Code
├── API Provider: Anthropic
├── Base URL: https://gw.claudeapi.com or https://hk.claudeapi.com
├── API Key: sk-your-claudeapi-key
├── Model: claude-opus-4-7
│          claude-opus-4-6
│          claude-sonnet-4-6
│          claude-haiku-4-5-20251001
└── Adaptive Thinking: High for coding, None for low-cost chat
Common errors & troubleshooting
Most setup failures come from provider mismatch, an incorrect base URL, or model dropdown validation. Check these items before changing anything else.
| Error | Likely cause | Fix |
|---|---|---|
401 Unauthorized |
API key is wrong or contains extra spaces | Re-copy the key and remove leading or trailing whitespace |
403 Forbidden |
The key was created without the required group | Create a new key and select the correct group |
404 Not Found |
Base URL includes /v1, or the model ID is misspelled |
Remove /v1 and verify the exact model ID |
model: model_not_found |
The extension validates custom model IDs too strictly | Upgrade the extension or use claude-opus-4-6 |
429 Too Many Requests |
Group concurrency limit reached | Lower Cline concurrency or switch to a higher-capacity group |
| Streaming response stops | Route instability during long streaming output | Try the alternate ClaudeAPI route and reduce competing network traffic |
| Cline stalls mid-task | Thinking budget is high and context is long | Try Medium temporarily or test with a smaller model |
Summary
Cline + ClaudeAPI is the most straightforward setup for running Claude inside Cursor with token-based billing. Install Cline, select the Anthropic provider, enable a custom base URL, enter your ClaudeAPI key, and type claude-opus-4-7 manually if the dropdown does not list it.
Roo Code uses the same basic configuration pattern, but its default behavior is more aggressive and some versions can be stricter about custom model IDs. For most developers, Cline should be the first option and Roo Code should be treated as an advanced or existing-workflow path.
Get started
Start with pay-as-you-go billing and no editor subscription requirement. Get an API key.