Connect AutoClaw to claudeapi.com: Get Claude Opus 4.7 Running in Your Local Agent in 5 Minutes
AutoClaw is a desktop Agent application with a built-in local Gateway. It ships with multiple Agent templates — AutoClaw, DeepResearch, Cron, Browser Use — and supports MCP Servers, a Skills Store, plus connections to Telegram, WhatsApp, Lark, and other messaging platforms. Out of the box it offers Auto and GLM-5-Turbo as built-in models, but to get the best results — especially for complex planning, code generation, and long-context research — plugging in an external Claude Opus 4.7 is the most impactful upgrade you can make.

This guide follows the exact UI flow: Settings → Models & API → Add Custom Model → Fill in the form → Connectivity Test → Save — every field covered, nothing left to guess. By the end, you’ll be chatting with Claude.
Applies to: AutoClaw current release (with Settings/Models & API module and Hermes Evolution Board).
1. Before You Start: Three Things You’ll Need
| Item | How to Get It | Notes |
|---|---|---|
| AutoClaw client | Already installed and running | You should see “Purchase / Files / Agent” in the top bar |
| claudeapi.com account | Sign up at claudeapi.com → top up any amount in the console | Minimum top-up is $1; new users can also try a redemption code |
| API Key | claudeapi.com console → Create Key (starts with sk-) |
Copy and save securely — you’ll paste it during setup |
Save these parameters somewhere handy so you’re not switching between windows:
Provider:        Custom
API Protocol:    Anthropic
Base URL:        https://gw.claudeapi.com
Model ID:        claude-opus-4-7
Display Name:    claude-opus-4-7
Context Window:  200000
Max Output:      32000
Provider:        Custom
API Protocol:    Anthropic
Base URL:        https://gw.claudeapi.com
Model ID:        claude-opus-4-7
Display Name:    claude-opus-4-7
Context Window:  200000
Max Output:      32000
2. Step 1: Open Settings
Click Settings (the gear + slider icon) in the bottom-left corner of AutoClaw’s main interface.
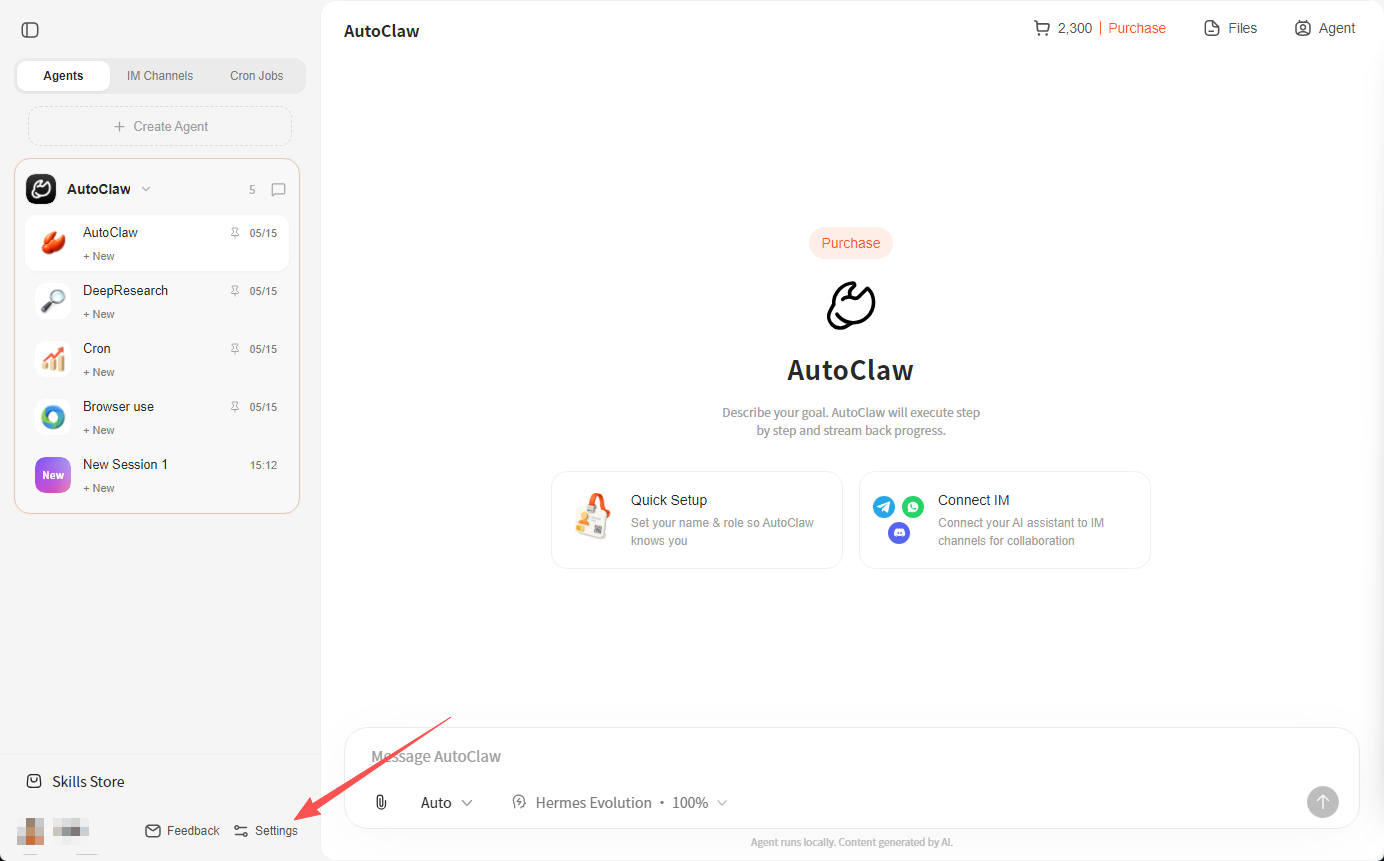
You’ll also see Feedback on the same row. Settings is the gear-shaped one.
3. Step 2: Navigate to Models & API
Select Models & API from the left sidebar.
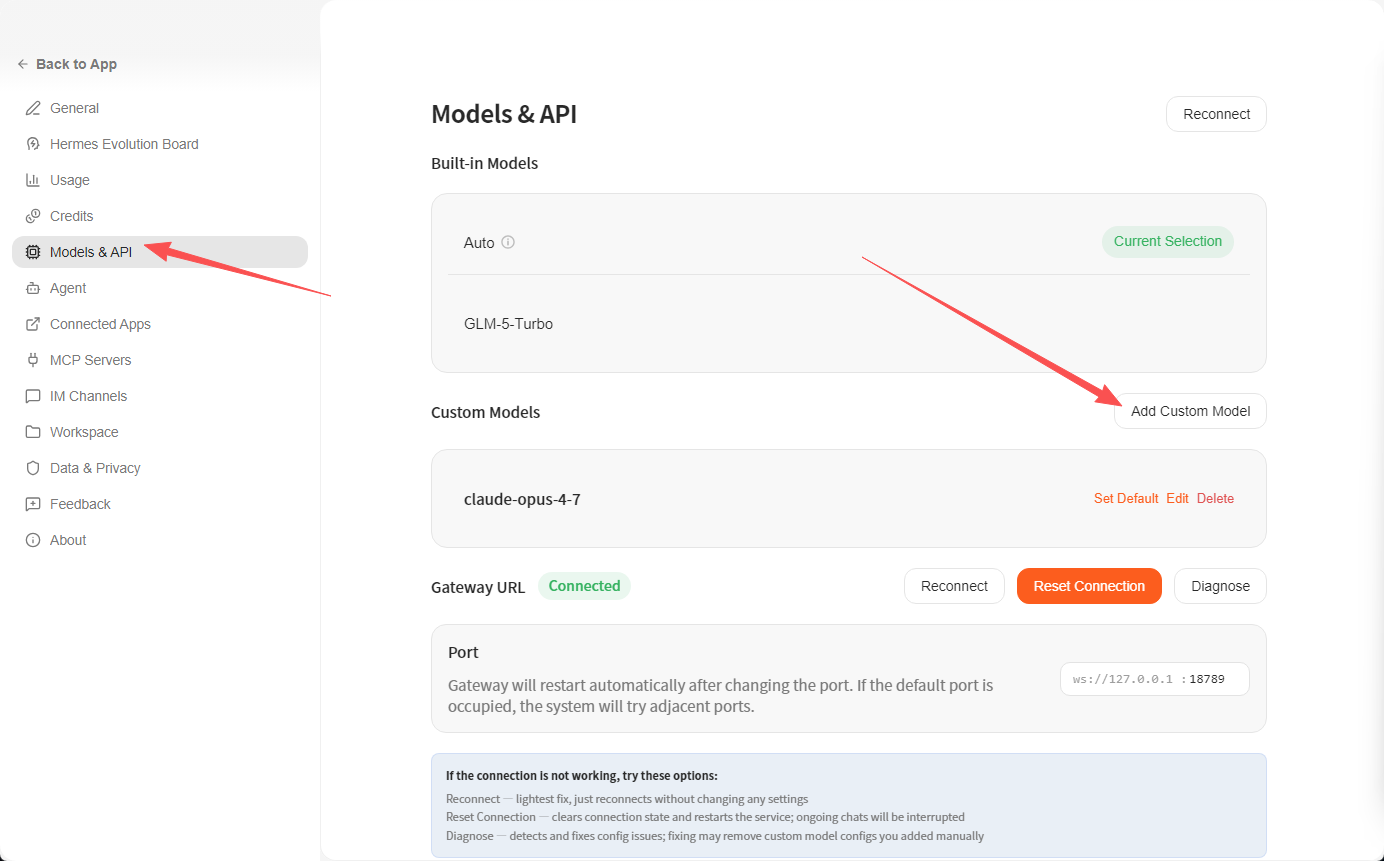
This page has two sections:
- Built-in Models:
AutoandGLM-5-Turbo— ready to use with no configuration. - Custom Models: Where you add external models. Look for the Add Custom Model button on the right.
Claude goes into the Custom Models section. Click Add Custom Model.
At the bottom of the page you’ll see Gateway URL showing
Connected, with a default port ofws://127.0.0.1:18789. AutoClaw communicates with external models through this local Gateway — it must showConnectedbefore you proceed. If it showsDisconnected, click Reconnect in the upper right first.
4. Step 3: Fill In the Add Model Form (The Core Step)
The Add Model dialog contains the following fields. Fill them in exactly as shown:

| Field | Value | Notes |
|---|---|---|
| Provider ⭐ | Custom |
Select Custom from the dropdown to activate the other fields |
| Model ID ⭐ | claude-opus-4-7 |
Model identifier, matches Anthropic’s official naming |
| Display Name | claude-opus-4-7 |
Display label — can be the same as Model ID |
| API Key | Paste your sk-xxx… |
Generated in the claudeapi.com console |
| API Protocol | Anthropic |
Do not select OpenAI — you must use the native Anthropic protocol |
| Base URL ⭐ | https://gw.claudeapi.com |
claudeapi.com’s native gateway endpoint (do not append /v1) |
| Context Window | 200000 |
Claude 4.x standard 200K context window |
| Max Output | 32000 |
Maximum output tokens per request — safe default for Opus 4.x |
The yellow notice at the top reads: “By adding an external model, you acknowledge and agree to use it at your own risk.” This is AutoClaw’s standard disclaimer for all external models — just acknowledge and proceed.
What About Other Claude Models?
To add a different Claude model, just swap Model ID and Display Name to the corresponding string — everything else stays the same:
| Model You Want | Model ID |
|---|---|
| Latest flagship | claude-opus-4-7 |
| Opus stable | claude-opus-4-6 |
| Balanced workhorse | claude-sonnet-4-6 |
| Fast & lightweight | claude-haiku-4-5-20251001 |
💡 How to choose:
claude-sonnet-4-6offers the best price-to-performance for daily use,claude-opus-4-7for complex planning and long code generation,claude-haiku-4-5-20251001for high-frequency routing and classification tasks.
5. Step 4: Run the Connectivity Test (Strongly Recommended)
After filling in the form, don’t hit Save yet — click the Connectivity Test button at the bottom.
The button description reads:
Not tested yet — Sends a real request using the current config to verify the endpoint.
It fires an actual API request using your configuration. Here’s what to expect:
| Result | Meaning | Action |
|---|---|---|
| ✅ Test passed | Gateway reachable, key valid, model ID recognized | Go ahead and Save |
| ❌ 401 Unauthorized | API Key invalid or insufficient permissions | Verify the key in your claudeapi.com console — check for disabled keys |
| ❌ 404 / Model not found | Model ID typo | Copy the exact string from the table in this guide |
| ❌ Connection refused / Timeout | Gateway URL incorrect or network issue | Confirm Base URL is https://gw.claudeapi.com (no /v1 suffix) |
| ❌ Insufficient balance | Account balance too low | Top up in the console and retry |
Once the test passes, click Save to finish.
6. Step 5: Set Claude Opus 4.7 as the Default Model
Back on the Models & API page, you’ll see claude-opus-4-7 in the Custom Models section with three actions:
- Set Default: Make it the default model for all conversations
- Edit: Modify configuration (key rotation, parameter adjustments, etc.)
- Delete: Remove the model
Click Set Default to make AutoClaw use Claude Opus 4.7 by default across all Agents.
7. Step 6: Go Back to the Chat Interface and Start Talking
Click ← Back to App in the upper left to return to the main interface.
Key things to verify:
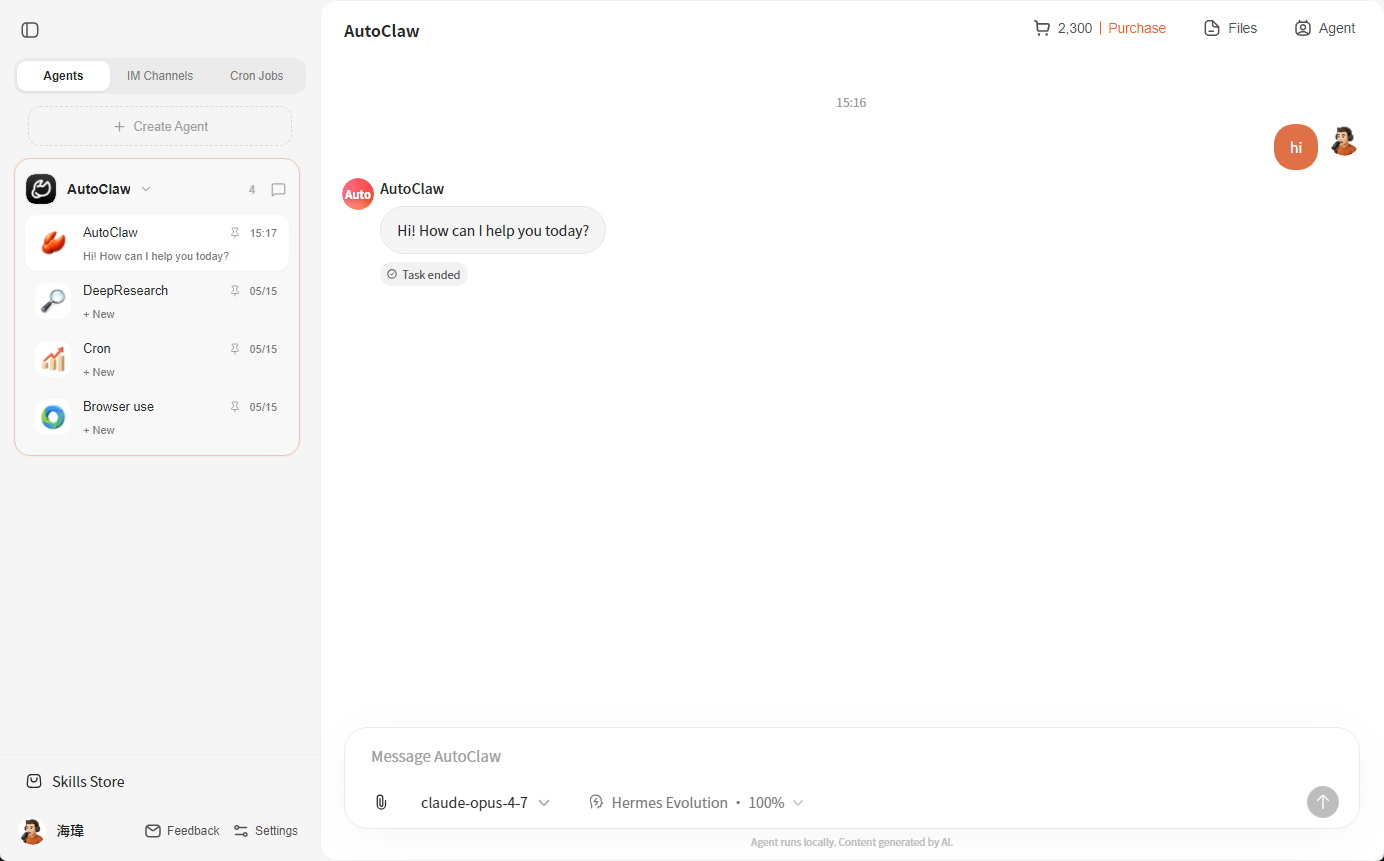
- Model selector at the bottom shows
claude-opus-4-7(click the dropdown to switch between added models) - Capability bar on the right reads
Hermes Evolution · 100%— this is AutoClaw’s intelligence evolution indicator; full bar means you’re running the strongest configuration - Top-right corner shows your account quota (e.g.,
2,300 | Purchase)
Send a quick test message:
hi
hi
You should immediately get a response from Claude (something like “Hi! How can I help you today?”). When you see the Task ended label, AutoClaw has detected that the interaction round is complete.
8. Going Further: Feed Claude to All Your Agents
AutoClaw’s Agents tab on the left ships with four templates, each configurable with its own default model:
| Agent | Purpose | Recommended Model |
|---|---|---|
| AutoClaw | General task planning + step execution | claude-opus-4-7 |
| DeepResearch | Deep research, multi-source synthesis | claude-opus-4-7 |
| Cron | Scheduled tasks, periodic triggers | claude-sonnet-4-6 |
| Browser use | Browser automation (clicking, filling forms, scraping) | claude-sonnet-4-6 |
You can also click + Create Agent at the top to create new Agents with individually assigned models — for example, Cron tasks on Sonnet 4.6 to save costs, while DeepResearch runs on Opus 4.7 for maximum quality.
Want to Save More? Use a Tiered Strategy
High-frequency routing / simple classification  →  claude-haiku-4-5-20251001
Everyday chat / content generation              →  claude-sonnet-4-6
Complex planning / critical decisions           →  claude-opus-4-7
High-frequency routing / simple classification  →  claude-haiku-4-5-20251001
Everyday chat / content generation              →  claude-sonnet-4-6
Complex planning / critical decisions           →  claude-opus-4-7
claudeapi.com pricing across three tiers (per million tokens):
| Model | Input | Output |
|---|---|---|
| Haiku 4.5 | $0.80 | $4.00 |
| Sonnet 4.6 | $3.00 | $15.00 |
| Opus 4.7 | $15.00 | $75.00 |
With a “70% Haiku + 25% Sonnet + 5% Opus” split, you can cut costs by over 50% compared to running everything on Sonnet.
9. Connecting IM Channels & Skills
The main interface has two quick-access cards:
- Quick Setup: Set your name and role so AutoClaw better understands your context
- Connect IM: Hook your Agent into Telegram, WhatsApp, Lark, and other messaging platforms — chat with Claude right inside your favorite messenger
The Skills Store in the bottom left lets you mount skill packs to extend capabilities. These all share the Claude model you configured above — set it up once, use it everywhere.
10. Troubleshooting
Issue 1: Gateway URL Shows Disconnected
The three buttons at the bottom of the page, in order of escalation:
| Button | What It Does | When to Use |
|---|---|---|
| Reconnect | Lightest fix — reconnects without changing config | Try this first when the connection drops |
| Reset Connection | Clears connection state and restarts the service; in-progress conversations will be interrupted | Escalate to this if Reconnect doesn’t work |
| Diagnose | Detects and fixes configuration issues; may remove manually added custom models | Last resort — only if you’re willing to reconfigure |
⚠️ Use Diagnose with caution: It may wipe your manually added Custom Models. Back up your configuration screenshots first.
Issue 2: Connectivity Test Keeps Returning 401
Check these in order:
- Is the API Key fully copied? (No leading/trailing spaces or missing characters)
- Is the key still in “Enabled” status? (Console → Key Management)
- Does the account have sufficient balance?
- Is the Base URL exactly
https://gw.claudeapi.com? (Do not usegw.claudeapi.com/v1— that’s the OpenAI-compatible path, but AutoClaw uses the native Anthropic protocol here)
Issue 3: Model Not Visible in the Selector After Saving
Click Reconnect in the upper right of the Models & API page, then go back to the main interface and open the model dropdown — it should appear.
Issue 4: Conversation Error “context length exceeded”
Edit the model and increase the Context Window value. Opus 4.7 / Sonnet 4.6 support up to 1M (1000000). Note that Opus 4.7 uses a newer tokenizer — the same text may consume roughly 35% more tokens, making long conversations hit the limit more frequently.
Issue 5: Slow Response / High Latency
claudeapi.com routes through optimized channels by default, with latency typically stable under 200ms. If you’re experiencing issues:
- Disable any proxy/VPN (claudeapi.com provides direct access — a proxy can actually slow things down)
- Check if your firewall is blocking
gw.claudeapi.com - Review real-time request logs in the claudeapi.com console to determine whether the issue is at the gateway or model level
11. FAQ
Q1: Are AutoClaw and OpenClaw the same thing?
No. OpenClaw and AutoClaw are different products. This tutorial is specifically for AutoClaw (the desktop Agent application with a local Gateway and Hermes Evolution Board).
Q2: Can I select OpenAI as the API Protocol?
No. AutoClaw’s Anthropic protocol path uses the native Messages API, which correctly handles Claude-specific fields like tool_use, cache_control, and thinking. Selecting OpenAI will cause you to lose these capabilities.
Q3: Can I add multiple Claude models at the same time?
Yes. Repeat Steps 3-5 with a different Model ID each time. Once added, the model selector at the bottom will show all your models — switch between them anytime with the dropdown.
Q4: Is Max Output 32000 enough?
For the vast majority of conversation scenarios, yes. If you’re doing long code generation or lengthy document translation, edit the model and increase it to 64000 (Sonnet 4.6 maximum) or 128000 (Opus 4.6 / 4.7 maximum).
12. Summary
Here’s the complete flow at a glance:
AutoClaw Client
    └─ Settings
        └─ Models & API
            └─ Add Custom Model
                ├─ Provider: Custom
                ├─ Protocol: Anthropic
                ├─ Base URL: https://gw.claudeapi.com
                ├─ Model ID: claude-opus-4-7
                ├─ API Key: sk-xxx (from claudeapi.com console)
                └─ Connectivity Test ✅ → Save → Set Default
                    └─ Back to main → Select model in bottom dropdown → Start chatting
Once connected, every Agent inside AutoClaw (AutoClaw / DeepResearch / Cron / Browser Use / custom), every IM channel, and every Skill automatically shares the same Claude quota. Configure once, use everywhere.
👉 Sign up at claudeapi.com | 💰 Go to Top-Up Center | 🤝 Apply for Partnership
Screenshots and workflow in this tutorial are based on the AutoClaw release as of 2026-05-21. If the interface has been updated, defer to what you see in the app.