
Claude Code is Anthropic’s official end-to-end AI programming tool that understands your entire codebase, performs everyday tasks, interprets complex code, and handles Git workflows through natural language commands.
The flagship model uses Opus 4.6 models and supports up to 1M context windows. For domestic developers to connect directly to the official service, they need an overseas credit card, networking tools, and face the risk of being blocked - not a bad threshold.
Claude API is relayed through https://claudeapi.com, and the Claude Code can be run in 5 minutes**. The whole domestic network direct connection, support Alipay/WeChat recharge, no need to register Anthropic account.
I. Front Preparation
Before you start, confirm two things: that your local environment is ready, and that you have your API Key.
1.1 Environment requirements
| Project | Requirements |
|---|---|
| Operating System | macOS 10.15+ / Linux (major distributions) / Windows 10+ (native support or WSL) |
| Terminal Tools | macOS with its own Terminal or iTerm2; Windows with PowerShell or WSL Terminal |
| Node.js | ≥ 18 required for npm install only (native install Node.js not required) |
💡 Important Changes: The 2026 Native Installer removes the Node.js dependency and resolves the vast majority of installation issues previously caused by incompatible versions of Node.js. If you’ve gotten stuck before due to environmental issues, you can now rest easy.
1.2 Registering claudeapi.com and getting an API Key
This is the step where you get your own key, which will be used for configuration.
**Step 1: Register an account
Open https://claudeapi.com and click Register, complete the registration with your email or cell phone number and enter the backend control panel.
Step 2: Top up your balance
Find the “Recharge” entrance in the background, choose Alipay or WeChat payment. The platform exchange rate is **1 yuan = 1 U.S. dollar amount **, it is recommended to first charge 5-10 yuan for testing, and then increase the amount as needed after running through.
**Step 3: Create an API token
Enter “API Token” page → Click “Add Token” → Fill in the name as you like (e.g. claude-code-main) → Set the amount to unlimited → Click Create.
The page will display a string of keys starting with sk-, Copy and save it immediately, you will not be able to view it again after you leave the page.
⚠️ Hint: Be careful not to start or end with a space when copying a Key, this is one of the most common reasons for errors later.
Install Claude Code
Claude Code currently has a variety of installation methods, it is recommended to prioritize the use of the Native Installer (Native Installer), which is the best choice for the vast majority of users.
2.1 Method 1: Native Installer (recommended, no Node.js required)
Native installation is the fastest way, doesn’t require Node.js, doesn’t need to manage dependencies, and is automatically updated in the background.
**macOS / Linux / WSL: **
curl -fsSL https://claude.ai/install.sh | bash
curl -fsSL https://claude.ai/install.sh | bash
**Windows (PowerShell): **
irm https://claude.ai/install.ps1 | iex
irm https://claude.ai/install.ps1 | iex
**macOS (Homebrew): **
brew install --cask claude-code
brew install --cask claude-code
📌 Homebrew installs are not automatically updated, you need to run
brew upgrade claude-codeperiodically to get the latest features and security fixes.
Verify that the installation is complete:
claude --version
claude --version
The install script automatically downloads the binaries to the system directory and adds them to the PATH. open a new terminal window after the installation is complete to make sure the shell loads the new PATH entry.
**What should I do if I get “no response” after the install command? **
If you run curl -fsSL https://claude.ai/install.sh | bash and the terminal goes blank and looks stuck - don’t worry, it’s usually one of three things:
**Scenario 1: It’s still running, just not outputting anything
The workflow of this command is “download the script, then execute it”. If your network is slow, DNS resolution is delayed, or the connection to claude.ai is unstable, the terminal may be stuck for a few seconds or tens of seconds, and it may look like it’s not responding, but in fact, curl is still waiting for the server to respond.
Wait about 30 seconds. If it doesn’t respond, press Ctrl + C to interrupt, and then test connectivity individually:
curl -I https://claude.ai/install.sh
curl -I https://claude.ai/install.sh
- If this command also gets stuck and does not return - the problem is at the network level and not with Claude Code.
- If the HTTP status codes (e.g.
200,301,302) are returned correctly, the network is working, and you can just re-execute the install command.
Scenario 2: Your network to claude.ai is not working.
If curl -I in the previous step is also stuck, it means your network cannot access claude.ai. Common causes include:
- Anomalous proxy is open (Clash Global Mode / Rule Misinterception)
- Problems with DNS configuration
- The company/school network is limiting outbound requests
- Local certificate policy or firewall blocking
Execute the following three commands to troubleshoot step by step:
curl -I https://claude.ai
nslookup claude.ai
ping claude.ai
curl -I https://claude.ai
nslookup claude.ai
ping claude.ai
Criteria for judgment:
| Command | Normal behavior | Abnormal behavior |
|---|---|---|
curl -I |
Returns HTTP/2 200 or 301/302 |
Keeps circling around without returning → Network not available |
nslookup |
Returns IP address | Failed to resolve → DNS problem, try 8.8.8.8 or 223.5.5.5 |
ping |
delayed data return | 100% packet loss → walled or blocked by firewall |
💡 Quick Fix: If the proxy tool is causing the problem, turn off the proxy before running the install command. Or add
claude.aito the proxy’s direct connection rules.
**Scenario 3: The terminal is waiting for input, but you don’t notice it **
Some install scripts will pop up a confirmation prompt (e.g. Do you want to continue? [Y/n]) or trigger a system-level permission popup (security prompts for macOS) during execution. If your terminal window is small or the output is obscured, you may not see the prompt, causing the script to keep waiting for you to type.
In this case, you can switch to a more transparent installation - download the script locally first, then execute it with debug output:
curl -fSL https://claude.ai/install.sh -o /tmp/claude-install.sh && bash -x /tmp/claude-install.sh
curl -fSL https://claude.ai/install.sh -o /tmp/claude-install.sh && bash -x /tmp/claude-install.sh
Benefits of doing this:
- Separate download and execution: if it gets stuck during the download phase, you can immediately confirm that it’s a network problem.
bash -xenables debugging mode: every step of the script is printed out, so you can see where you went wrong at a glance.- Save the script locally: if it fails in the middle, you can just
bash -x /tmp/claude-install.shand retry without downloading again.
⚠️ Note: If you can’t download and install the script in any of the above ways, it means your current network environment really can’t connect to
claude.aidirectly. Try switching networks (e.g. a cell phone hotspot), or use the npm installation method described in the next section as an alternative.
2.2 Method 2: npm installation (old method, deprecated but still available)
The npm install method (npm install -g @anthropic-ai/claude-code) is still available, but has been deprecated as of March 2026 according to the official documentation. If your environment is unique (e.g., you need to lock down a particular version), you can still use this method:
# Make sure Node.js ≥ 18
node --version

# Install
npm install -g @anthropic-ai/claude-code

# Validate
claude --version
# Make sure Node.js ≥ 18
node --version

# Install
npm install -g @anthropic-ai/claude-code

# Validate
claude --version
⚠️ Do not use
sudoif you encounterEACCESpermission errors. Usingsudo npm install -gwill create files belonging to root, causing permissions problems with each subsequent npm global install. The root problem should be solved by changing the npm default directory or using nvm.
The proper way to fix permissions:
# Option A: Change the npm global catalog
mkdir -p ~/.npm-global
npm config set prefix '~/.npm-global'
# Then add export PATH=~/.npm-global/bin:$PATH to the shell configuration file

# Option B: Use nvm (recommended)
curl -o- https://raw.githubusercontent.com/nvm-sh/nvm/v0.40.0/install.sh | bash
nvm install 22
nvm use 22
npm install -g @anthropic-ai/claude-code
2.3 Migrating from an old npm installation to a native installation
If you previously installed Claude Code via npm, it is recommended that you migrate to the native installer. npm has been officially deprecated since the beginning of 2026, and while it still works, it will eventually stop receiving updates. The native installer starts faster, has zero dependencies, and handles updates automatically.
Migration steps:
# 1. Uninstall the npm version
npm uninstall -g @anthropic-ai/claude-code

# 2. Install the native version
curl -fsSL https://claude.ai/install.sh | bash # macOS/Linux
# or
irm https://claude.ai/install.ps1 | iex # Windows PowerShell

# 3. Verify
claude --version
# 1. Uninstall the npm version
npm uninstall -g @anthropic-ai/claude-code

# 2. Install the native version
curl -fsSL https://claude.ai/install.sh | bash # macOS/Linux
# or
irm https://claude.ai/install.ps1 | iex # Windows PowerShell

# 3. Verify
claude --version
💡 Your configuration file (
~/.claude/settings.json) and project settings (.claude/) will be preserved during the migration process and do not need to be reconfigured.
2.4 Special Notes for Windows Users
Claude Code is now natively supported on Windows and can be installed directly from PowerShell or CMD. You no longer have to rely on WSL as you did before.
Two routes:
| Ways | For People | Description |— |— |— |— | Native Windows (recommended**) | Native Windows (recommended) | Most Windows users | Direct PowerShell installation, easiest | WSL | Developers who prefer Linux environments | Install WSL and do it the Linux way. | WSL | Developers who prefer Linux environments | Install WSL and then do it the Linux way |
If you choose a native Windows installation, do the entire process in PowerShell and do not mix PowerShell, CMD, Git Bash, and WSL during the installation phase.
III. Configuring access to claudeapi.com (core steps)
Claude Code uses two environment variables to determine “whose server to connect to” and “what identity to use”:
ANTHROPIC_AUTH_TOKEN: your API KeyANTHROPIC_BASE_URL: the address of your API service, set tohttps://code0.ai.
Three configuration options are provided below, from fast to steady, as needed.
3.1 Way 1: Temporary Configuration (for quick testing)
Set environment variables directly in the terminal, and close the terminal to disable them. This is a good way to see if you can get it to work:
cd your-project
export ANTHROPIC_AUTH_TOKEN=sk-your-key
export ANTHROPIC_BASE_URL=https://code0.ai
claude
cd your-project
export ANTHROPIC_AUTH_TOKEN=sk-your-key
export ANTHROPIC_BASE_URL=https://code0.ai
claude
If everything works, you will see the Claude Code interactive interface. This way you have to reset it every time you open a new terminal, so it is only recommended for the first test.
3.2 Method 2: Write to Shell Configuration File (permanent)
Write environment variables into the shell startup file and load them automatically every time you open a new terminal.
**Zsh (macOS default): **
echo 'export ANTHROPIC_AUTH_TOKEN=sk-your-Key' >> ~/.zshrc
echo 'export ANTHROPIC_BASE_URL=https://code0.ai' >> ~/.zshrc
source ~/.zshrc
echo 'export ANTHROPIC_AUTH_TOKEN=sk-your-Key' >> ~/.zshrc
echo 'export ANTHROPIC_BASE_URL=https://code0.ai' >> ~/.zshrc
source ~/.zshrc
Bash (most Linux / WSL defaults):
echo 'export ANTHROPIC_AUTH_TOKEN=sk-your-Key' >> ~/.bashrc
echo 'export ANTHROPIC_BASE_URL=https://code0.ai' >> ~/.bashrc
source ~/.bashrc
echo 'export ANTHROPIC_AUTH_TOKEN=sk-your-Key' >> ~/.bashrc
echo 'export ANTHROPIC_BASE_URL=https://code0.ai' >> ~/.bashrc
source ~/.bashrc
Fish:
set -Ux ANTHROPIC_AUTH_TOKEN sk-your Key
set -Ux ANTHROPIC_BASE_URL https://code0.ai
set -Ux ANTHROPIC_AUTH_TOKEN sk-your Key
set -Ux ANTHROPIC_BASE_URL https://code0.ai
Windows PowerShell (permanent):
setx ANTHROPIC_AUTH_TOKEN "sk-your-Key"
setx ANTHROPIC_BASE_URL "https://code0.ai"
setx ANTHROPIC_AUTH_TOKEN "sk-your-Key"
setx ANTHROPIC_BASE_URL "https://code0.ai"
Close and reopen the PowerShell window after the settings are complete for them to take effect.
This is simple and straightforward, but exposes the key to the Shell configuration file. If your dotfiles are synchronized to GitHub, you need to be careful about security.
3.3 Way 3: settings.json configuration file (recommended✅)
This is Claude Code’s natively supported configuration method, which doesn’t pollute the Shell environment and is much clearer to maintain.
**Global configuration (effective for all projects): **
File path: ~/.claude/settings.json.
{
  "env": {
    "ANTHROPIC_AUTH_TOKEN": "sk-your-Key",.
    "ANTHROPIC_BASE_URL": "https://code0.ai"
  }
}
{
  "env": {
    "ANTHROPIC_AUTH_TOKEN": "sk-your-Key",.
    "ANTHROPIC_BASE_URL": "https://code0.ai"
  }
}
If the
~/.claudedirectory does not exist, create it first:mkdir -p ~/.claudemkdir -p ~/.claude
**Project level configuration (current project only): **
File path: your project root/.claude/settings.json
{
  "env": {
    "ANTHROPIC_AUTH_TOKEN": "sk-anotherKey",.
    "ANTHROPIC_BASE_URL": "https://code0.ai"
  }
}
{
  "env": {
    "ANTHROPIC_AUTH_TOKEN": "sk-anotherKey",.
    "ANTHROPIC_BASE_URL": "https://code0.ai"
  }
}
Project-level configurations have higher priority than global configurations. This feature is useful if you use different Keys for different projects (e.g. separate billing for personal and corporate projects).
✅ Recommended Solution: Most people just use the global
settings.json. Once paired, common to all projects, won’t leave sensitive information in the Shell environment.
3.4 Verifying Successful Configuration
Whichever way you chose, now open a terminal and go to any project directory:
cd any-project-folder
claude
cd any-project-folder
claude
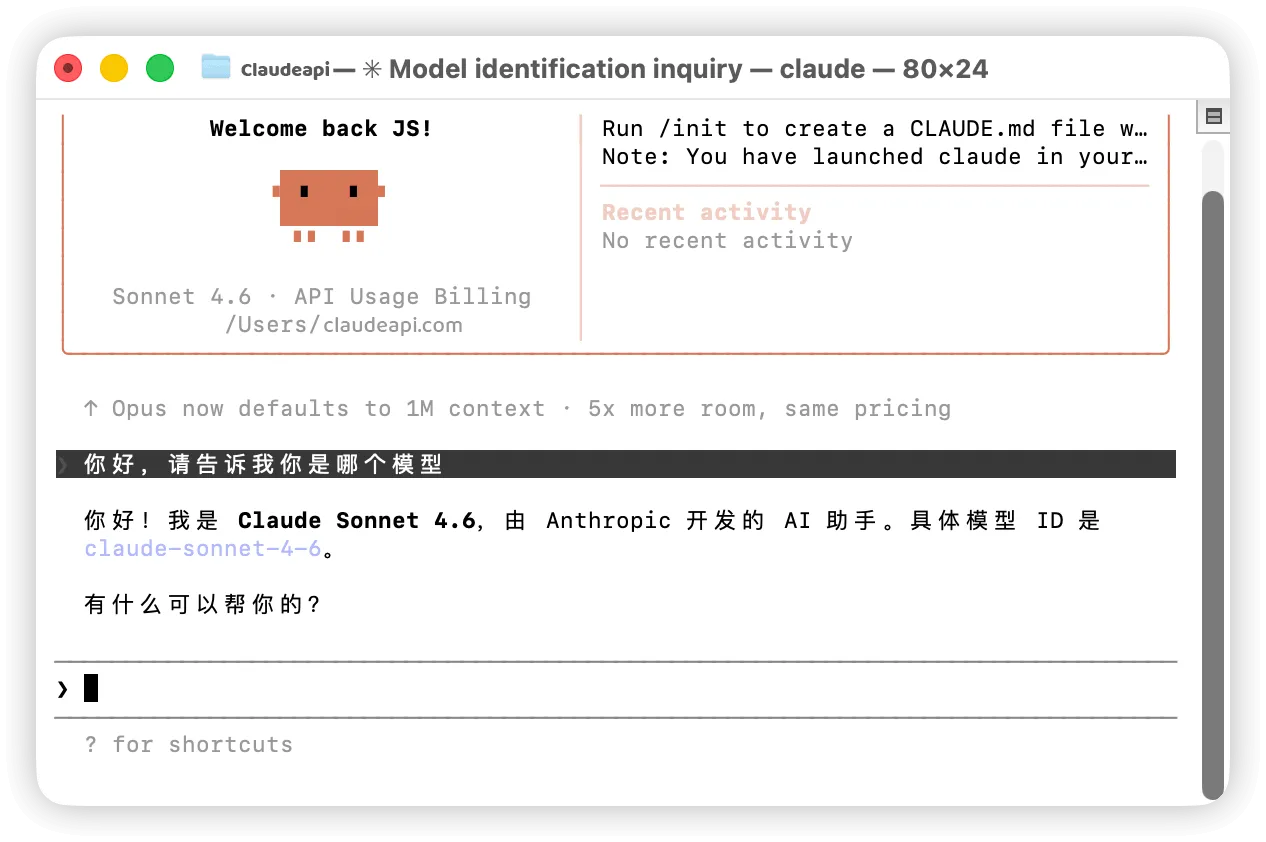
Once you are in the Claude Code interactive interface, type:
Hello, please tell me which model you are
Hello, please tell me which model you are
Success flag: Received a normal Chinese reply and showed that the current model is Claude Opus 4.6 or Sonnet 4.6.
 Congratulations - Claude Code is now working in China.
💡 Additional Tips: For the first run if you are not sure if your environment is normal or not, you can use the
/doctorcommand to auto-detect common configuration issues, it will check your Node.js version, authentication status, MCP server health, and file permissions, and it is recommended that you run it once before troubleshooting manually.
<img src=“/blog/claude-code-china-setup/claude-code-doctor-command-result.webp” alt=“Screenshot of Claude Code /doctor command diagnostic results: showing environment configuration checking passes” width=“” 1266" height=“842” />
Using Claude Code in VS Code
In addition to the terminal CLI, if you don’t like the command line mode, you can install the Claude Code extension in the VS Code editor.
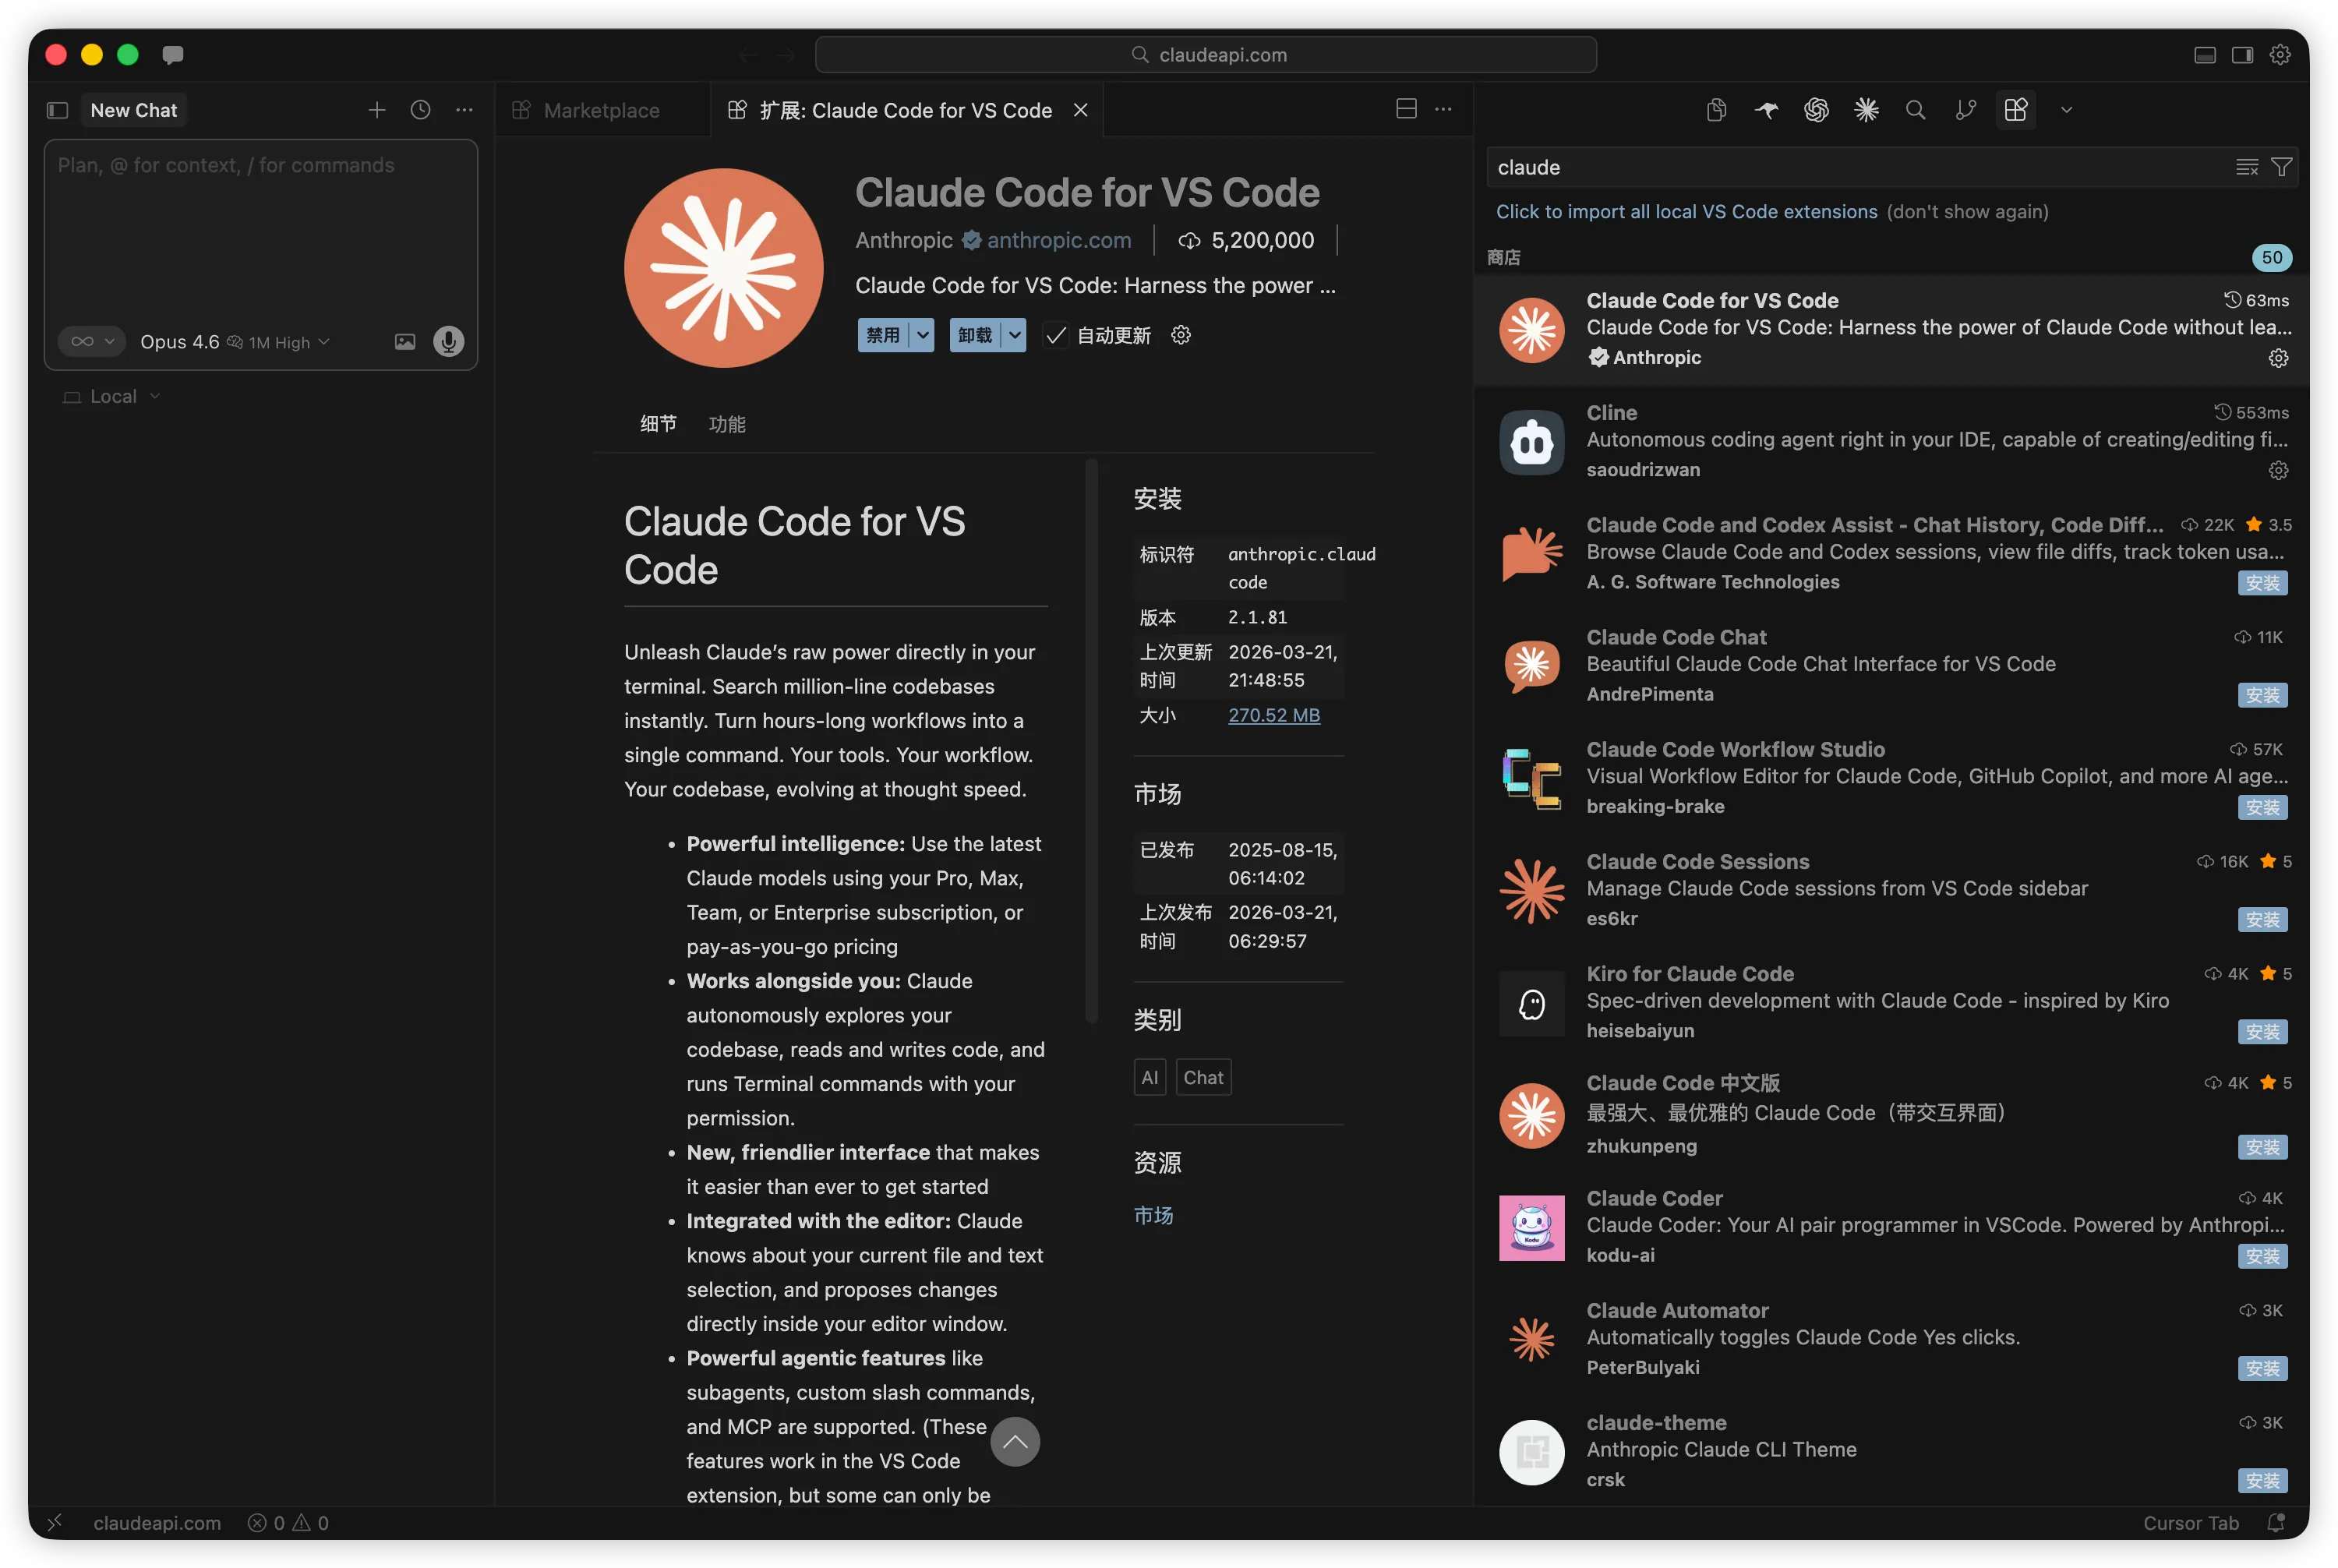
4.1 Installing the extension
Open VS Code → Go to the extension marketplace (Cmd+Shift+X / Ctrl+Shift+X) → Search for Claude Code → Install.
 ### 4.2 Configuring the API
The easiest way to configure the API is to use the global ~/.claude/settings.json (configured in the previous chapter), which is automatically read by the VS Code extension.
Alternatively, enter /config in VS Code to access the settings screen for configuration.
4.3 Utility Features
After the installation is complete, you can:
- Select code for Claude to interpret or modify
- Quote the contents of a file using
@filename. - Toggle permission modes (normal / scheduled / auto-accept) with
Shift+Tab. - Manually compress the context using
/compact.
💡 This article focuses on CLI usage because it is the most stable, versatile, and closest to what Claude Code was designed to do, and VS Code extensions are the icing on the cake.
—VS Code extensions are the icing on the cake.
V. Model Switching and Selection Suggestions
claudeapi.com supports several Claude models, and different models have obvious differences in capability and price. Choosing the right model according to the type of task can guarantee the effect and control the cost.
5.1 Comparison of available models
| Models | Scenarios | Price Stages | Recommendations |
|— |— |— |— |— |—
| claude-opus-4-6 | Complex Architecture Design, Large Code Refactoring, Difficult Debug | Most Expensive | ⭐ On-Demand |
| claude-sonnet-4-6 | Everyday Programming, Functional Development, Code Review | Medium | ⭐⭐⭐⭐ Everyday Preferred |
| claude-haiku-4-5 | Simple Q&A, code completion, formatting | Cheapest | ⭐⭐⭐ Money Saving Tool |
For more detailed model pricing, check out the Pricing and Model Selection Guide.
5.2 Switching Models in Claude Code
Method 1: Runtime command switching
Enter in the Claude Code interactive interface:
/model claude-sonnet-4-6
/model claude-sonnet-4-6
Switching takes effect instantly, no need to reboot.
Method 2: Specify the default model in settings.json
Add ANTHROPIC_MODEL to your global or project level settings.json:
{
  "env": {
    "ANTHROPIC_AUTH_TOKEN": "sk-your-Key",.
    "ANTHROPIC_BASE_URL": "https://code0.ai",
    "ANTHROPIC_MODEL": "claude-sonnet-4-6"
  }
}
{
  "env": {
    "ANTHROPIC_AUTH_TOKEN": "sk-your-Key",.
    "ANTHROPIC_BASE_URL": "https://code0.ai",
    "ANTHROPIC_MODEL": "claude-sonnet-4-6"
  }
}
This will default to the specified model every time Claude Code is started.
5.3 Money-saving suggestions
Claude Code is billed in tokens. A single Claude Code command typically generates 8 to 12 API calls, and a single heavy session can cost $0.50 to $2.00 in API costs. Here are a few habits that can significantly reduce your expenses:
- Use Sonnet 4.6 for day-to-day development and manually
/modelto Opus and back when you have a complex architectural problem. - Compact the context with the
/compactcommand. Token consumption can skyrocket when conversations get long, and/compactcleans up redundant history and preserves critical information. - Tone down reasoning with
/effort. Low inference is fast and inexpensive for simple tasks like changing a variable name or adding a comment.
Effort levels are simplified to low/medium/high, and can be reset to default with /effort auto.
VI. Common Error Reporting and Troubleshooting
Problems in the configuration process? The following is a list of the 7 most common error reporting scenarios, which you can check one by one in the format of “Symptom → Cause → Solution”.
6.1 Invalid API Key or `401 Unauthorized
Cause: The API Key is not copied completely, or there is a space at the beginning and end.
Troubleshooting: Run in terminal:
echo $ANTHROPIC_AUTH_TOKEN
echo $ANTHROPIC_AUTH_TOKEN
Checks if the output starts with sk- and has no extra characters at the end.
Solution: Go back to claudeapi.com backend and re-copy the Key. If you are using the settings.json configuration method, open the file and make sure that there are no spaces inside the quotes.
6.2 Connection refused or `ECONNREFUSED
Cause: ANTHROPIC_BASE_URL is written incorrectly.
Troubleshooting:
echo $ANTHROPIC_BASE_URL
echo $ANTHROPIC_BASE_URL
Verify that the output is https://code0.ai, and note:
- It must be
httpsnothttp. - Do not add
/** at the end of **. - Don’t misspell the domain name.
Solution: Reload the configuration after fixing the URL (source ~/.zshrc or restart the terminal).
6.3 timeout or prolonged unresponsiveness
Cause: Local proxy software (Clash, V2Ray, etc.) has a connection conflict with Claude Code.
Troubleshooting steps:
Use curl to test if the API is reachable:
curl -s https://code0.ai/v1/models \
  -H "Authorization: Bearer sk-your-key"
curl -s https://code0.ai/v1/models \
  -H "Authorization: Bearer sk-your-key"
- If curl returns JSON data correctly, but Claude Code gets stuck - odds are it’s the proxy tool.
- Turn off proxies like Clash / V2Ray, or add
code0.aito the direct connection rules (no proxies) and try again.
Solution: claudeapi.com itself is a transit service optimized for domestic networks, so it doesn’t need a proxy under normal circumstances. Turn off the proxy direct connection instead faster.
6.4 Showing offline status
Reason: Claude Code will try to connect to Google and other external services to check the network status during startup.
Conclusion: This status alert does not affect the actual usage. Ignore it and you will get a response as usual.
6.5 Models return garbled or broken code.
Cause: The “Enhanced Mode” or “Global Mode” of the agent software interferes with SSE (Server-Sent Events) streaming. The agent tool buffers packets, resulting in garbled or sudden interruptions in the streaming output.
Solution (either one or the other):
- Disable the proxy tool’s Enhanced Mode.
- Add
code0.aito the proxy software’s list of direct connection rules to allow Claude Code traffic to bypass the proxy.
6.6 fetch failed
Reason: Claude Code’s web browsing function (e.g. /web command) needs to access external websites, and this part of the traffic does not go through claudeapi.com, so it may not be able to connect to it directly under domestic network.
Solution: The web browsing function requires additional web tool support, but normal code writing, Q&A, refactoring and other core functions are not affected at all. If you don’t need the web browsing function, you can ignore this error.
6.7 Permission error (EACCES / Permission denied)
Cause: Incorrect ownership of the .claude directory, commonly seen when it has been previously installed with sudo.
Troubleshooting and resolution:
# Fix the ownership of the .claude directory
sudo chown -R $(whoami) ~/.claude

# If it's a permissions issue with the npm installation, refer to Section 2.2 for the correct permissions fix
# Fix the ownership of the .claude directory
sudo chown -R $(whoami) ~/.claude

# If it's a permissions issue with the npm installation, refer to Section 2.2 for the correct permissions fix
💡 More error codes can be found in Error Checklist.
VII Advanced Tips
Claude Code is capable of much more than just “chatting in the terminal”. Here are a few features you should know about that can greatly improve your development efficiency.
7.1 Recurring Tasks (v2.1.71+)
Let Claude perform a certain check on a timed basis:
/loop 5m check the deploy status
/loop 5m check the deploy status
Automatically checks the deployment status every 5 minutes and reports back. Good for waiting for builds and deployments.
7.2 CLAUDE.md Project Specification
Create a CLAUDE.md file in the project root directory that Claude Code will automatically read at the beginning of each session. It will become part of the Claude system prompts, allowing the project context to be preloaded for each conversation.
# CLAUDE.md
## Project Description
This is a Next.js 14 project using TypeScript + Tailwind CSS.

## Code specification
- Components are written in functional style
- State management using Zustand
- API requests are placed in the /lib/api directory.

## Build and test
- npm run build # Build
- npm run test # Run tests
💡 Best Practices: Running the
/initcommand automatically generates CLAUDE.md.
Keep it concise and use the principle of “progressive disclosure” - don’t cram everything in, but tell Claude how to find the important information. And don’t use CLAUDE.md as a substitute for linter; the code style constraints will only inflate the context window.
7.3 MCP Server Integration
MCP (Model Context Protocol) allows Claude to no longer be limited to the current project’s code files, but to actively connect to resources and tools in the outside world - GitHub, databases, Figma, Jira, etc. - and allow the AI to read your repository Issue directly, Query databases, and get information about your design drafts.
# Add a GitHub MCP server
claude mcp add --transport http github https://api.githubcopilot.com/mcp/

# Add the database MCP server
claude mcp add --transport stdio db \
  -- npx -y @bytebase/dbhub \
  --dsn "postgresql://user:pass@host:5432/dbname"

# View configured servers
claude mcp list
\ --dsn "postgresql://user:pass@host:54b/dbname

The configuration and use of MCP is quite involved, please refer to [Claude Code Advanced Tips](/docs/claude-code/tips) for a detailed tutorial.

### 7.4 The Skills System


Skills is a major feature of Claude Code, which can be interpreted as a "proven workflow". You can create a skills file in the `~/.claude/skills/` directory, and the changes will take effect immediately without a restart. This allows team members to share proven best practices.

> 💡 This is just the tip of the iceberg of what Claude Code can do. More ways to play with it (custom Slash commands, Git integration workflows, multi-file batch refactoring, subagents, plugin systems, etc.) will be updated continuously in subsequent posts.

---

## VIII.

In retrospect, there are only three steps in the entire access process:

**1. Register [claudeapi.com](https://claudeapi.com)**, recharge and create an API Key.

**2. Install Claude Code** (native installation recommended):

```bash
# macOS / Linux
curl -fsSL https://claude.ai/install.sh | bash

# Windows PowerShell
irm https://claude.ai/install.ps1 | iex
3. Configure two variables (recommended to write to ~/.claude/settings.json):
{
  "env": {
    "ANTHROPIC_AUTH_TOKEN": "sk-your-Key",.
    "ANTHROPIC_BASE_URL": "https://code0.ai"
  }
}
{
  "env": {
    "ANTHROPIC_AUTH_TOKEN": "sk-your-Key",.
    "ANTHROPIC_BASE_URL": "https://code0.ai"
  }
}
Configuration is complete, open a terminal and type claude and you’re ready to go.
**Experiencing problems? **
→ Check out this article [Chapter 6: Common Error Reporting and Troubleshooting](#6 Common Error Reporting and Troubleshooting) covering the 7 most frequent error scenarios.
→ Use /doctor for automatic diagnosis.
→ For more questions visit the FAQ page or click on the right side to contact customer service to give you a solution.
**Want to access other tools? ** Claudeapi.com is the same as claudeapi.com. claudeapi.com also supports Cursor, Cline, Cherry Studio, etc. The configuration is similar. The configuration is similar. For a complete list, see Software Access Tutorial Catalog.
**Not registered yet? **